全部全局音频设置
这是 Behringer WING 几乎所有全局音频设置的综合概述,包括采样率、主/备选输入源、独听模式和集成的 USB 音频接口。
点击或轻触设置,跳转到相应的参考条目。
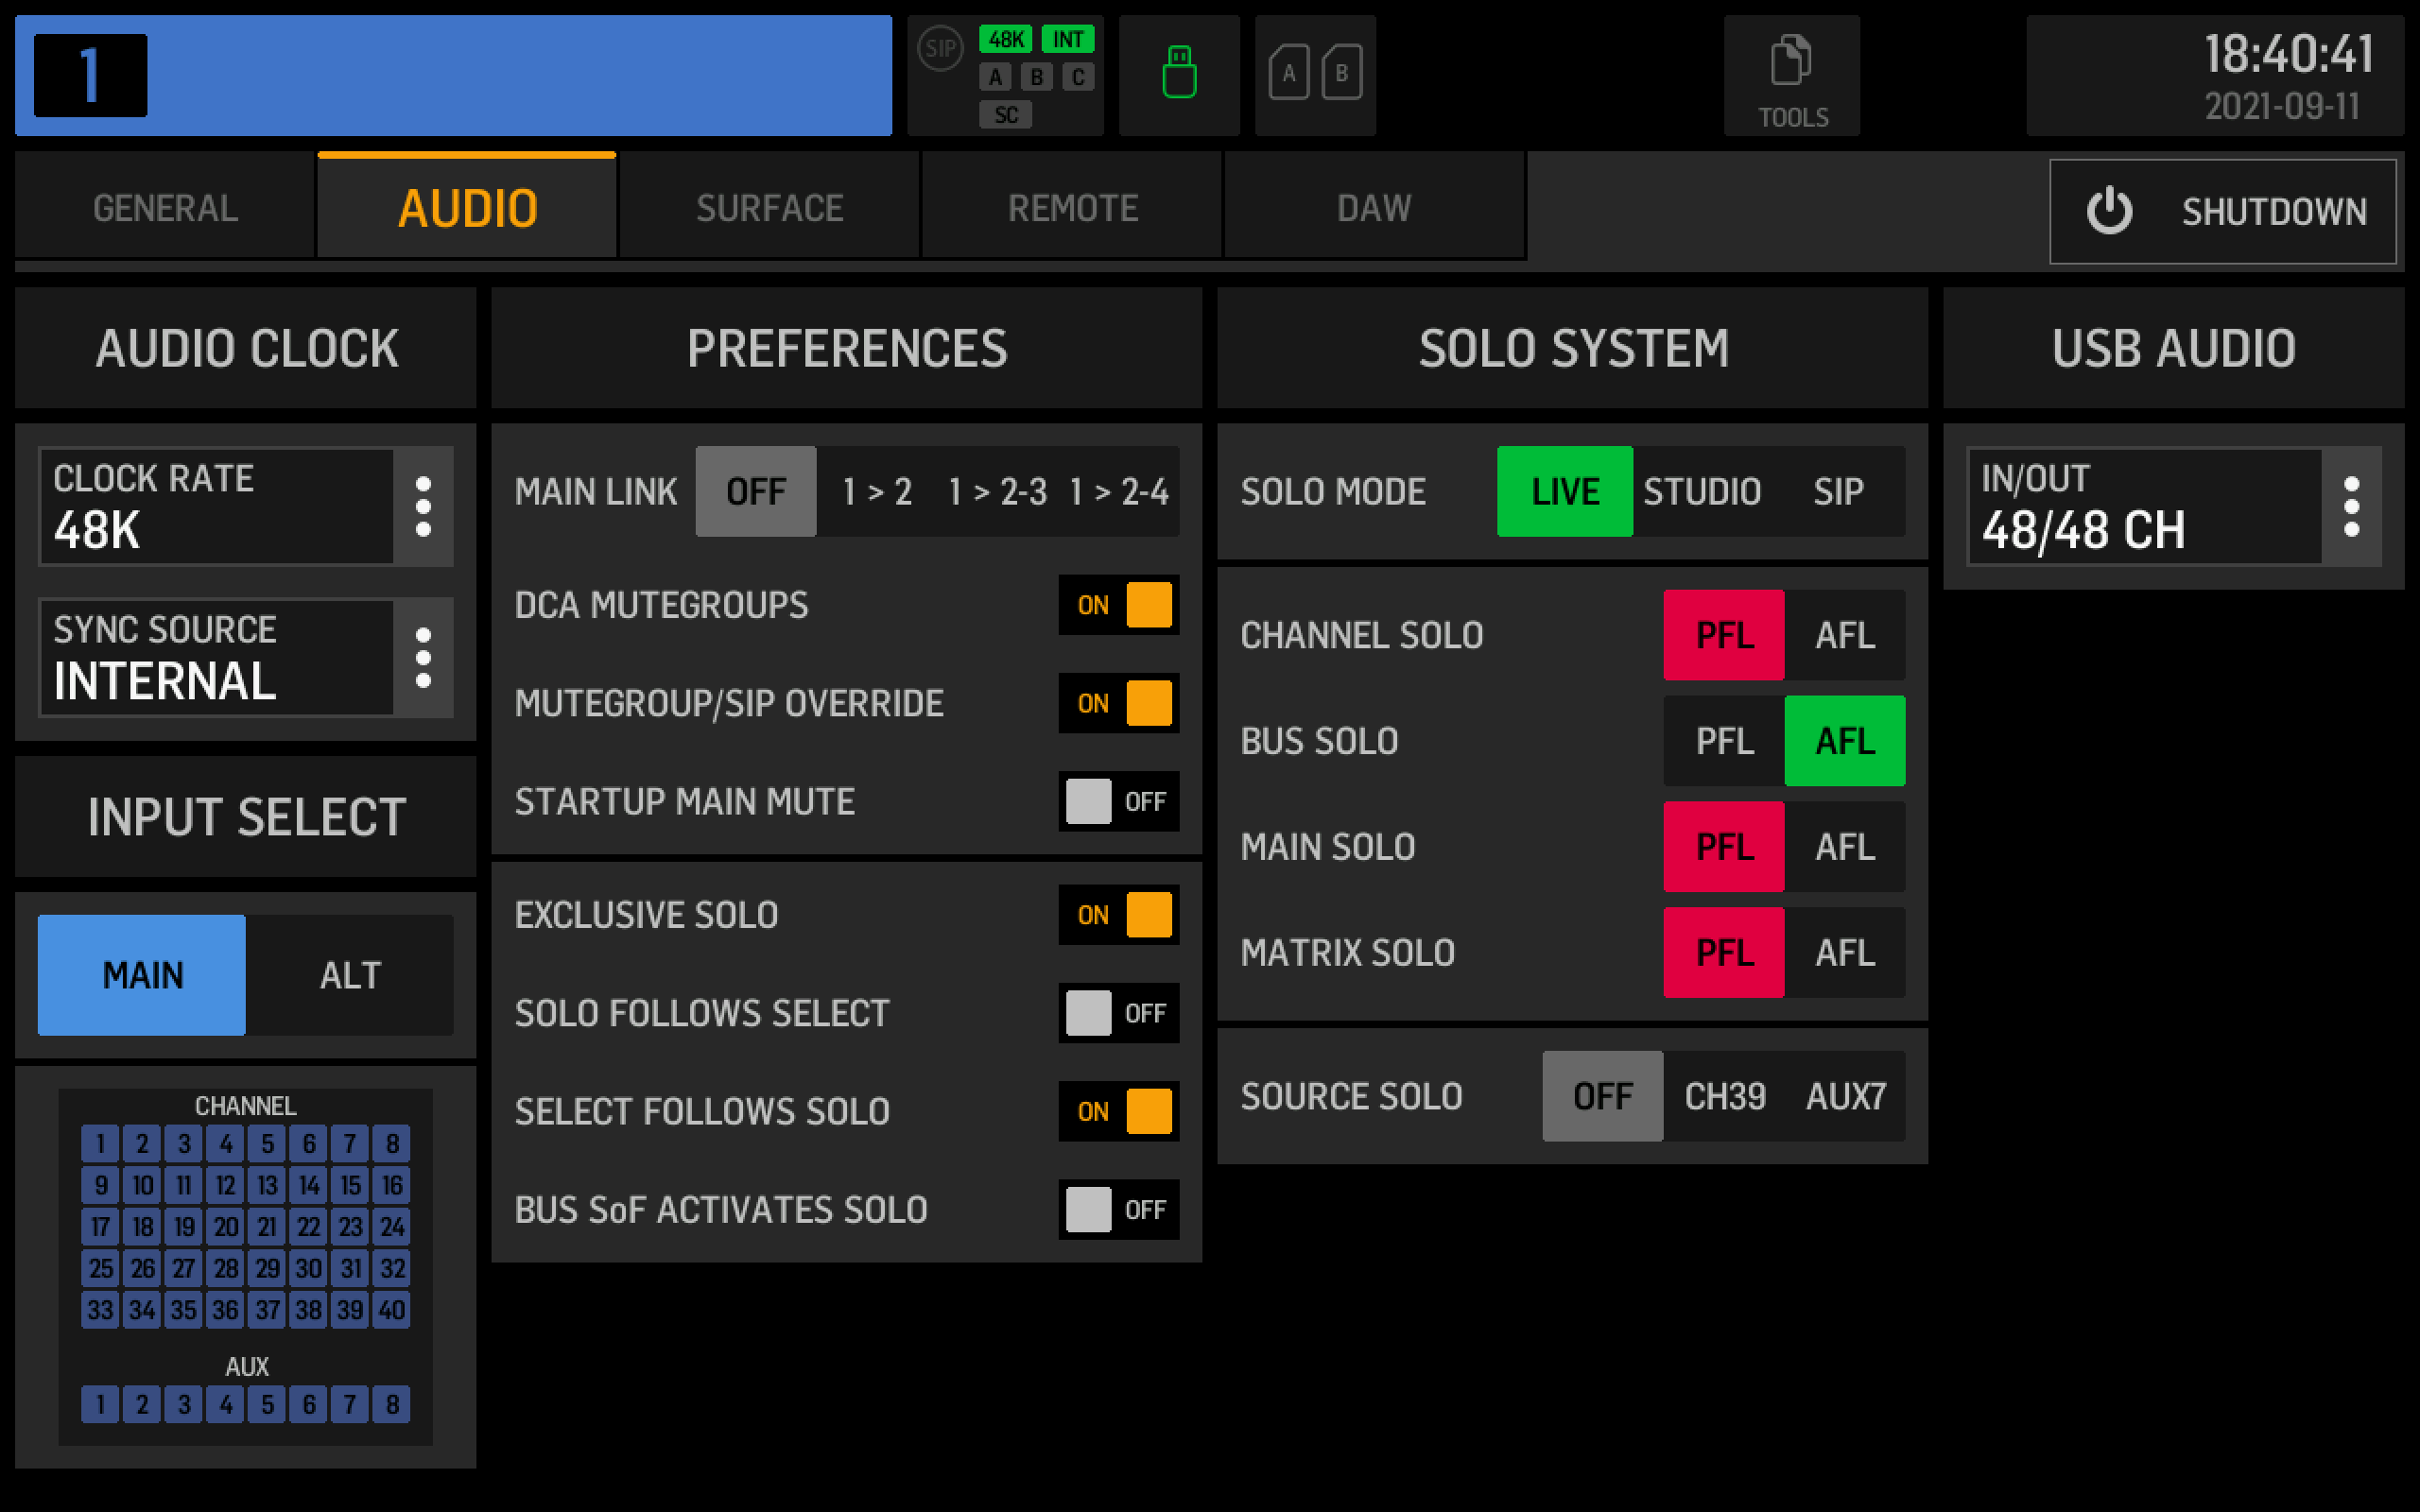
音频时钟:采样率
时钟或采样率定义了调音台每秒处理多少音频样本。有两种典型的采样率:CD 音频使用 44.1kHz,专业音乐制作使用 48kHz 或其倍数(如 96kHz 或 192kHz)。我建议你根据数字输入和输出选择你的采样率。WING 不支持采样率转换,因此所有 AES50 设备、USB 连接的 PC、SD 卡播放和录制以及 U 盘播放和录制都必须使用相同的速度。如果 WING 是同步源,则通过 AES50 连接的舞台箱将自动采用 WING 的采样率。
如果你通过 PC 或集成的 WING Live Card 进行多轨录音,则需要使用与项目余下部分相同的采样率。
如果你已经有一个装满歌曲供休息时间听用的 U盘,那么它很可能是 44.1kHz,这可能是一个方便之选。
音频时钟:同步源
同步源或时钟主设备是控制共享音频时钟的设备。该时钟同步样本播放和传输。在典型的现场设置中,包括一个调音台和一个或多个连接的接口箱,你将希望将 WING 内部时钟作为同步源。
如果你使用两个控制台,则应使增益主机成为同步源。假设你在前场使用 WING,并且在返听上使用 X32,其中 X32 控制话放。你将 X32 连接到 WING 上的 AES50 A 端口,并将 X32 的同步源设置为内部,而将 WING 的同步源设置为 AES50 A。
如果您正在使用 Dante 或其他扩展卡,则可以通过 “EXP CARD” 选项将其设置为同步源。“AES / EBU” 选项是指位于 WING 背面的双通道 XLR 数字音频输入。
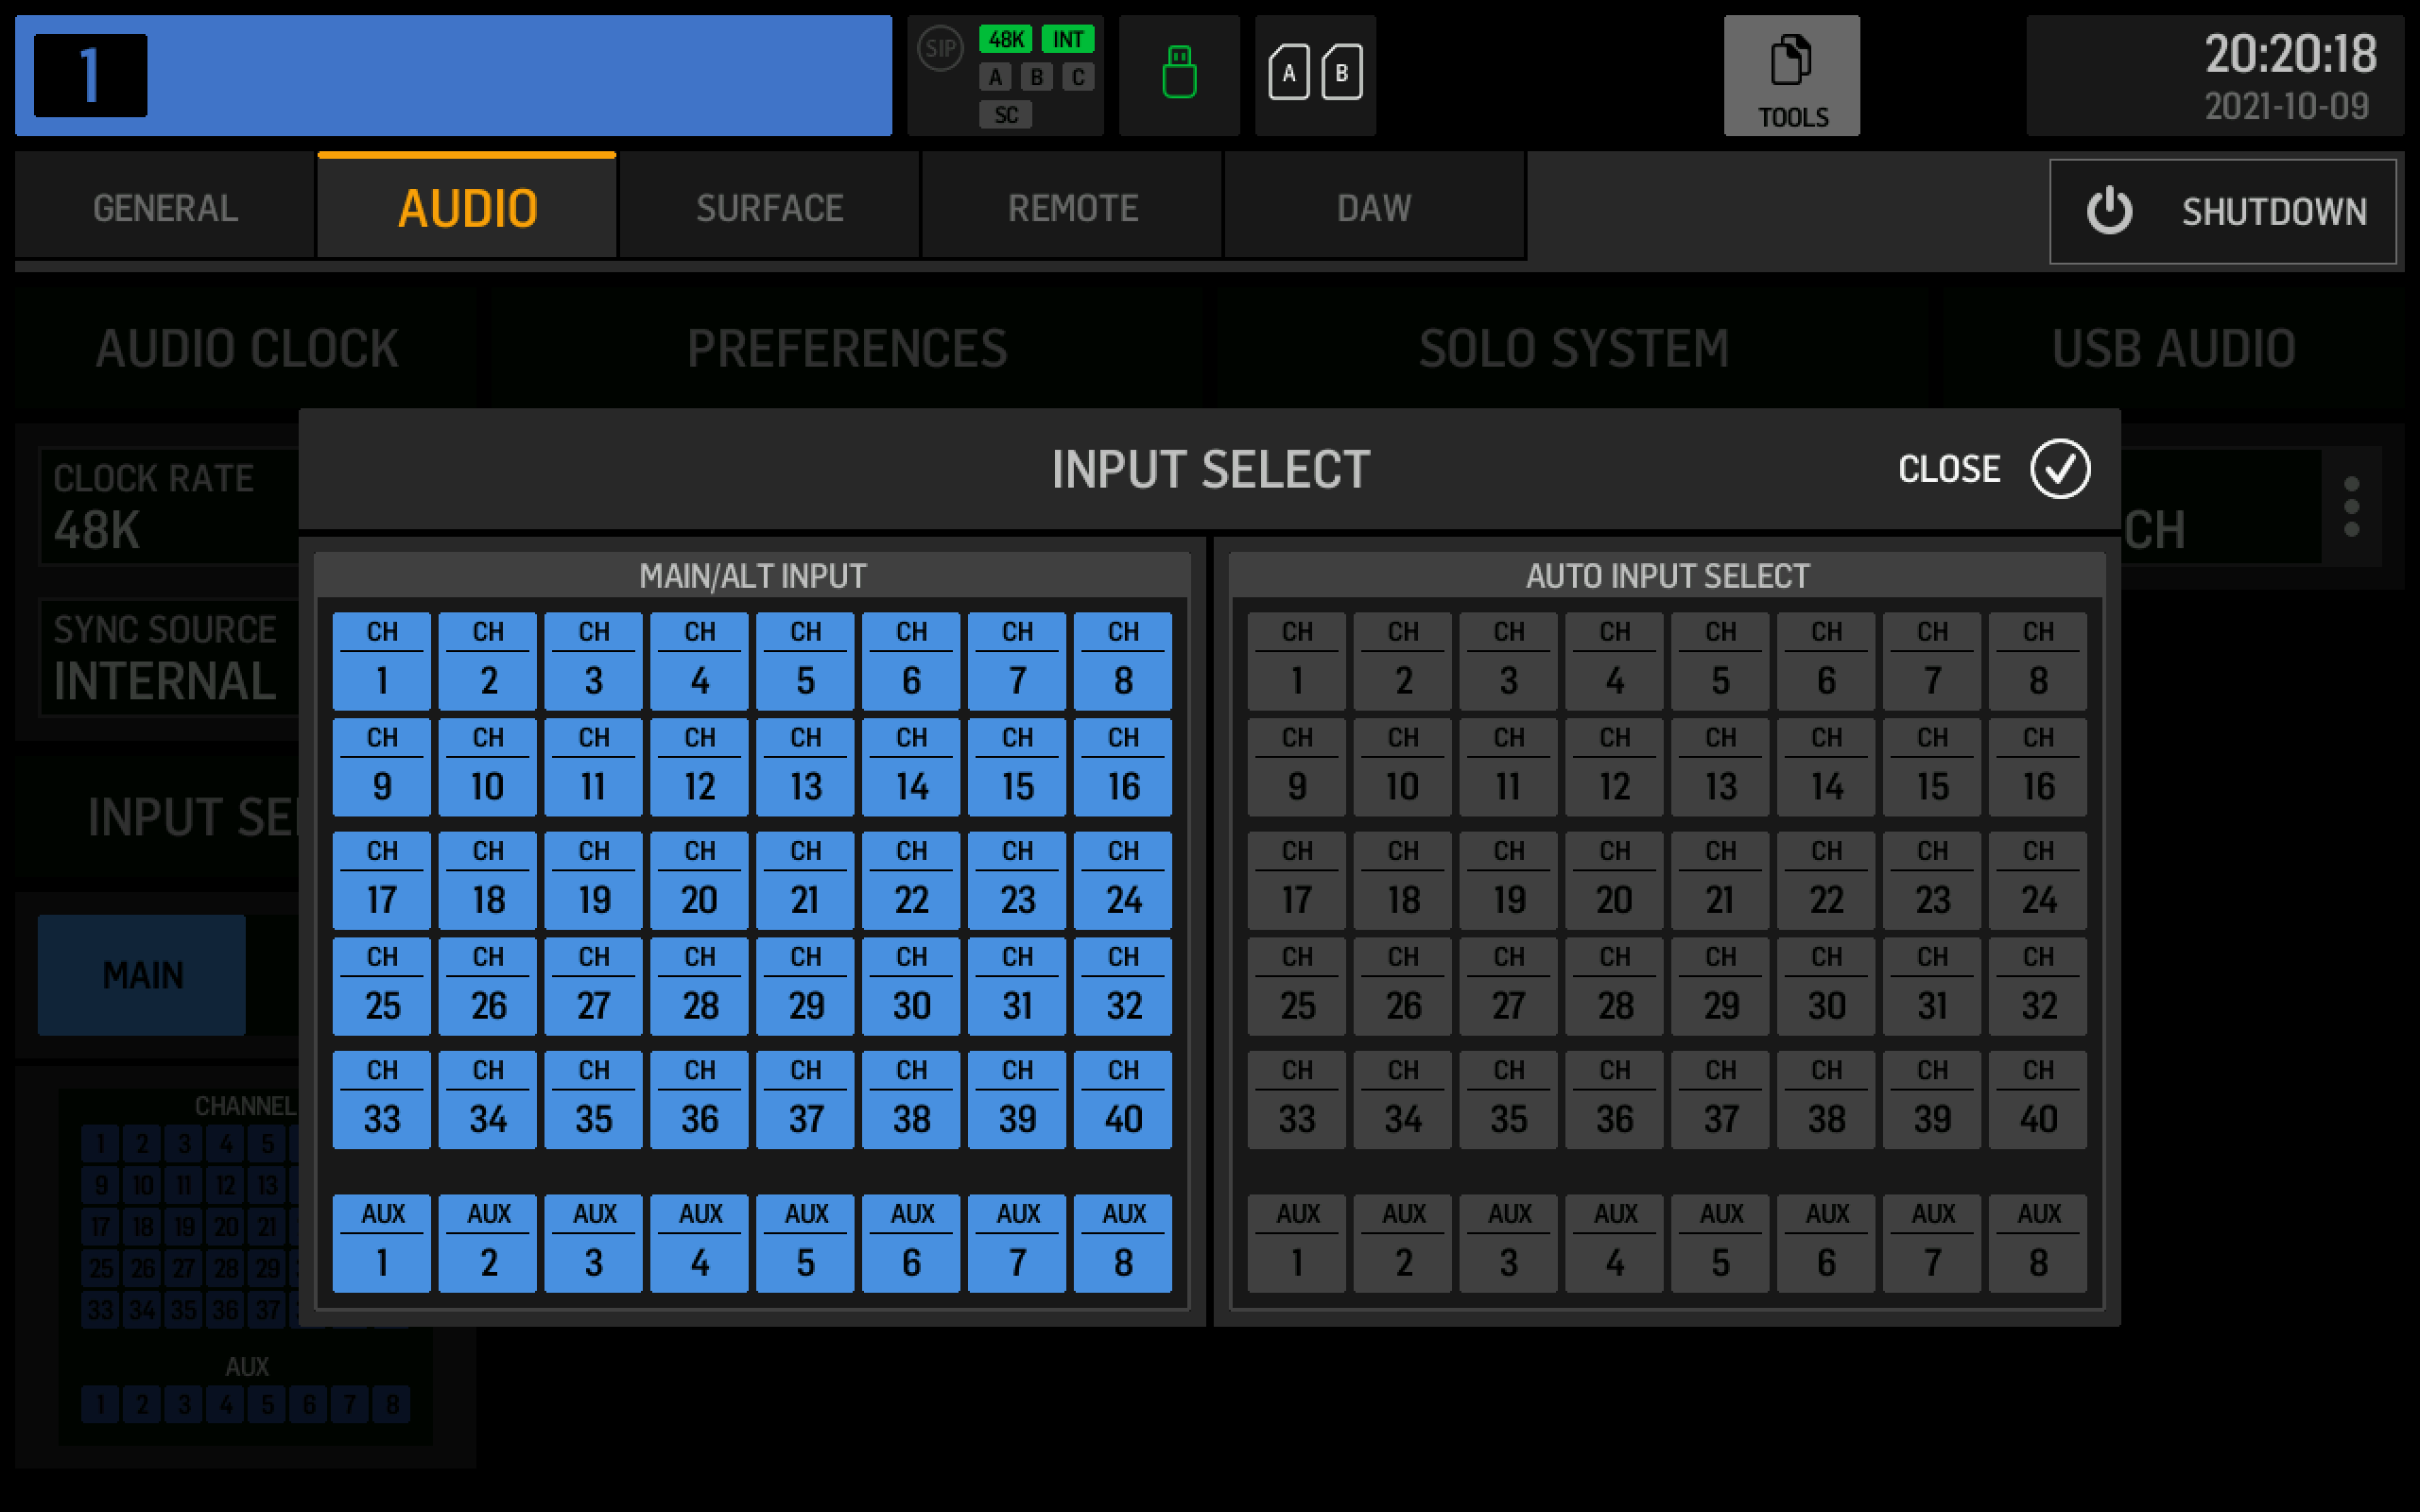
Input select
All input channels on the WING can have two sources. You use the main source for your regular live inputs, like mics and DIs, but also for CD playback or anything else you'll need throughout your show. If you have multitrack recordings of your show, add the recorder's playback as the alt source. If you switch from main to alt in the settings, you'll have a perfect virtual soundcheck environment. The input select setting in the global audio settings will switch all inputs. If you only want to change one input, you can do that in the channel's menu under the head amp settings (the second submenu). This is also where you can set up alt sources. To assign multiple alt sources at once, press the "ROUTING" button, select "CHANNELS" in the status bar, switch "CHANNEL INPUT" to alt, and disengage the lock.

You can exclude a channel from the global channel source switch by selecting "MANUAL" instead of "AUTO" in the head amp submenu under "INPUT SELECT".

With firmware version 1.11, Behringer added an overview screen to improve the management of channel sources. By pressing the grid of channel icons in the lower left of the screen, you open the new overview. The left side lets you manually switch channels between main (blue) and alt (orange). The right side controls the automatic vs. manual mode selection for the channel. In the example below, channels 1-16 will be switched automatically, while all others will not be affected by the global setting.
Preferences: Main link
I haven't been able to figure out what this setting does.
Preferences: DCA mute groups
When enabled, the mute button on DCAs will mute the channels assigned to the DCA, just like a mute group would do.
Preferences: Mute group / SIP override
Solo-in-Place acts like a reverse mute group. If you set solo mode to SIP, all other channels will be muted as soon as you solo one or more channels. As is the case with channels muted by a mute group, the channel's "MUTE" button will flash. The red flashing indicates that the channel is muted, but not by individually muting it and instead because a mute group, DCA, or SIP solo muted it.
This override setting determines what happens when you press the mute button of an externally muted channel. The default enabled setting will cause the channel to be unmuted, thus overriding the external mute. If the override is disabled and you press "MUTE", you'll switch it into the manually muted mode, and therefore unmuting the external mute source (like a DCA) after that will not unmute the channel itself.
Preferences: Startup main mute
I recommend you enable this handy setting. It mutes your main output when you boot the console, thus preventing feedback or unwanted sounds.
Solo System: Exclusive solo
When enabled, the console will solo only one channel at a time. If you solo channel one and then press the solo button for channel two, the first channel's solo will be deactivated.
Solo System: Solo follows select
When you select a channel, it will also automatically be soloed. This setting can be useful in combination with exclusive solo.
Solo System: Select follows solo
Pressing solo will also select the channel.
Solo System: Bus Sends-on-Faders activates
In the Sends-on-Faders mode, faders manipulate individual sends to a single selected bus. If this setting is enabled and you enter Sends-on-Fader mode, the WING will automatically solo the bus you're mixing.
Solo System: Solo mode
In earlier versions of the WING firmware, you could change the solo and monitoring settings in the monitoring/talkback menu accessible through the "VIEW" button next to the monitoring controls.
Live
In the live mode, audio played through the main busses will not be affected if you solo a channel.
Studio
I haven't been able to figure out what this setting does.
Solo-in-Place
Solo-in-Place is also called destructive solo because it will mute all other channels once you press a solo button. This mode can be useful for soundchecks, but you should be careful to change it back to the live mode before the show starts. Because this mode is so dangerous, Behringer added a SIP badge to the status bar, left of the clock rate indicator.
Solo System: PFL or AFL
A PFL or Pre-Fader-Listen solo takes the soloed channel's audio without taking the fader into account. The level set by the fader will not affect the volume in your headphones. It can be useful to set a PFL dim level in the monitoring settings (press the "VIEW" button on the surface to access them).
An AFL or After-Fader-Listen solo applies the fader level to the channel's solo. Therefore channels with a lower level will be quieter on the monitors, and channels with a higher level will be louder. This mode preserves the relative volume differences of channels when you listen to them together.
Solo types can differ for channels, busses, mains, and matrixes.
Solo System: Source Solo
Introduced with firmware version 1.11.
If you select either CH39 or AUX7, the WING will automatically customize the corresponding channel with an icon and label and set it to be used as the source solo.
You can tap the SRC SOLO button on the sources routing page and select a source, and the WING will send it to the channel you selected earlier. You can use the source solo to quickly preview sources without assigning them to channels.

USB Audio: In/Out
The In/Out setting controls the number of channels the internal USB audio interface exposes to a connected PC or Mac. You can reduce it if you're using a slow computer or have connection issues.
The options are:
- 2ch/2ch
- 8ch/8ch
- 16ch/16ch
- 32ch/32ch
- 48ch/48ch